noticed those pipes |> in elixir eh? yeah real nice! here’s what it’d look like without pipes:
1
Enum.sum(Enum.filter(1..999,fn x -> rem(x,3) === 0 or rem(x,5) === 0 end))
noticed I used Enum instead of Stream this time? Yes it let’s you choose between Lazy and Eager evaluation.
where does the fn ... end come from? yeah this is how you define a lambda function, whereas in the first example I was using Function Capturing. Yeah .. haven’t seen it outside of elixir either.
Basically works like this:
1 2 3 4 5 6 7 8 9 10 11 12 13 14 15
# regular function inside a module defmodule Math do def square(x) do x*x end end IO.write Math.square(5)
# immediately invoked lambda function IO.write (fn x -> x*x end).(5)
# Function capture IO.write (&(&1*&1)).(5)
# outputs 252525
this makes it extremely comftie to pass as lambda :)
clisp --help‘s line -c [-l] lispfile [-o outputfile] - compile lispfile got my curiosity. Stack Overflow told me i can access command line arguments with *args*.
So let’s compile the 8th of the 99-lisp-problems.
1 2 3 4 5 6 7 8 9 10 11 12
(defun unique (lst) (when lst (cond ; if the 1st and 2nd list items are the same, skip car and call unique on the cdr ((equal (car lst) (cadr lst)) (unique (cdr lst)) ) ; else, just append the car to the rest of the unique list (T (append (list (car lst)) (unique (cdr lst))) ) ) ) ) ; *args* it's been given from the commandline (print (unique *args*))
running clisp -c unique.lisp and changing execution permissions.
to let bash know how to execute it, prepend the shebang line #!/usr/bin/clisp (or find out ur own path to clisp with whereis clisp) to unique.fas.
et voila:
1 2
phil@HAL:~/development/lisp/scratchpad$ 🐵 ./unique a b c c c d d e f f ("a" "b" "c" "d" "e" "f")
symbolic linking unique to /usr/bin with ln -s would let us call it without the ./ and would let it look like some of our gnu utils or shell builtin ;)
Mentioning my progress in learning Lisp during a check-in today got us into expressing ANDOR and NOT with the Lisp if expression.
1 2 3 4 5 6 7
; AND -> A and B can be any expression returning T or NIL (if A B A)
;equivalent of (and A B)
Think of it! If A is returns T then our if expression returns the return value of the expression B. Otherwise if A returns NIL the if expression returns A .. which we already know, is NIL.
example: even AND divisibleBy4
1 2 3 4 5 6
(defparameter n 8) ;would return T (defparameter n 6) ;would return NIL
(if (= (mod n 2) 0) (= (mod n 2) 0); return the result of the even check (= (mod n 4) 0)); return the result of the divisibleBy4 check
for non-lispers out there here’s an implementation in javascript.
1 2 3 4 5 6 7 8 9 10 11 12 13
let checkIfEvenAndDivisibleBy4 = n => { if (n%2 === 0) { return (n%4 === 0) }else { return (n%2 === 0) } }
Escape callback hell now with Promises in ES6! They’re supported in all major browsers and basically look like this:
1 2 3 4 5 6 7 8 9 10 11 12 13 14
//basic syntax let myPromise = new Promise((resolve, reject) => { //do something asynchronous //for example fs.readfile or $.ajax('/user/3') //if that was successful resolve('done') //or reject() });
//whenever Promise has resolved ... myPromise.then(value => { //... do something console.log(value); //'done' })
for further demonstrations let’s create a mockup request function we can pass a desired amount of seconds parameter to. This will simulate an asynchronous operation and resolve after the specified time.
1 2 3 4 5 6 7
let Api = { requestSomething: seconds => new Promise((resolve, reject) => { setTimeout(() => { resolve(`promise resolved after ${seconds} seconds`) }, seconds * 1000) }) }
Sequential
now since our requestSomething function returns a promise, we can chain promises in a slick syntax like this:
//after all the promises have resolved ... Promise.all(promises).then(value => { console.log(value); })
//["promise resolved after 1 seconds", "promise resolved after 2 seconds", "promise resolved after 2 seconds", "promise resolved after 2 seconds", "promise resolved after 2 seconds", "promise resolved after 3 seconds"]
Promise.allreturns a new promise which will resolve after all the promises we passed it have resolved. The value that gets passed into the .then function is an array of all the resolve values from the initial requests.
what an awesome syntax to keep things clean and readable :)
Endnote
Notice that I always assumed that my requests will never fail. in real life specify a function in .then that handles a failed request like this:
Since I arrived without a smartphone, I haven’t been taking many pictures. I hope I can make up for it while getting done some touristy must do’s in the next couple weeks.
Impressions you get from the slideshow (click the picture above and use arrow keys or touch the picture on a mobile device) are based on:
commuting to RC
walking in Prospect Park, a small green oasis in the urban jungle of Brooklyn
acquiring a silk Kimono from at the Chelsea Flea Market. (finally! x3)
an awesome avocado store in Chinatown which only sells one type of avocado, and I mean ONLY.
Brooklyn Brick Oven pizza baking (Meetup)
People at Union Square wanting to talk me into voting for Bernie.
taking the staten island ferry (for free!) at sunset.
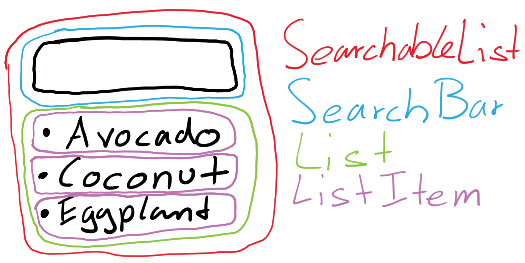
We will discover this technique by creating a searchable list component.
For the List to be able to display only the ListItems which match the filterText entered in the SearchBar, we need to pass filterText back to the parent component SearchableList. Having the filterText added to the state of SearchableList will automatically inform the List once filterText changes.
Remember: React is all about one-way data flow down the component hierarchy. It may not be immediately clear which component should own what state. This is often the most challenging part for newcomers to understand, so follow these steps to figure it out:
For each piece of state in your application:
Identify every component that renders something based on that state.
Find a common owner component (a single component above all the components that need the state in the hierarchy).
Either the common owner or another component higher up in the hierarchy should own the state.
If you can’t find a component where it makes sense to own the state, create a new component simply for holding the state and add it somewhere in the hierarchy above the common owner component.
Let’s run through this strategy for our application:
List needs to filter the ListItems based on state and SearchBar needs to display the search text and checked state.
The common owner component is SearchableList.
It conceptually makes sense for the filter text and checked value to live in SearchableList
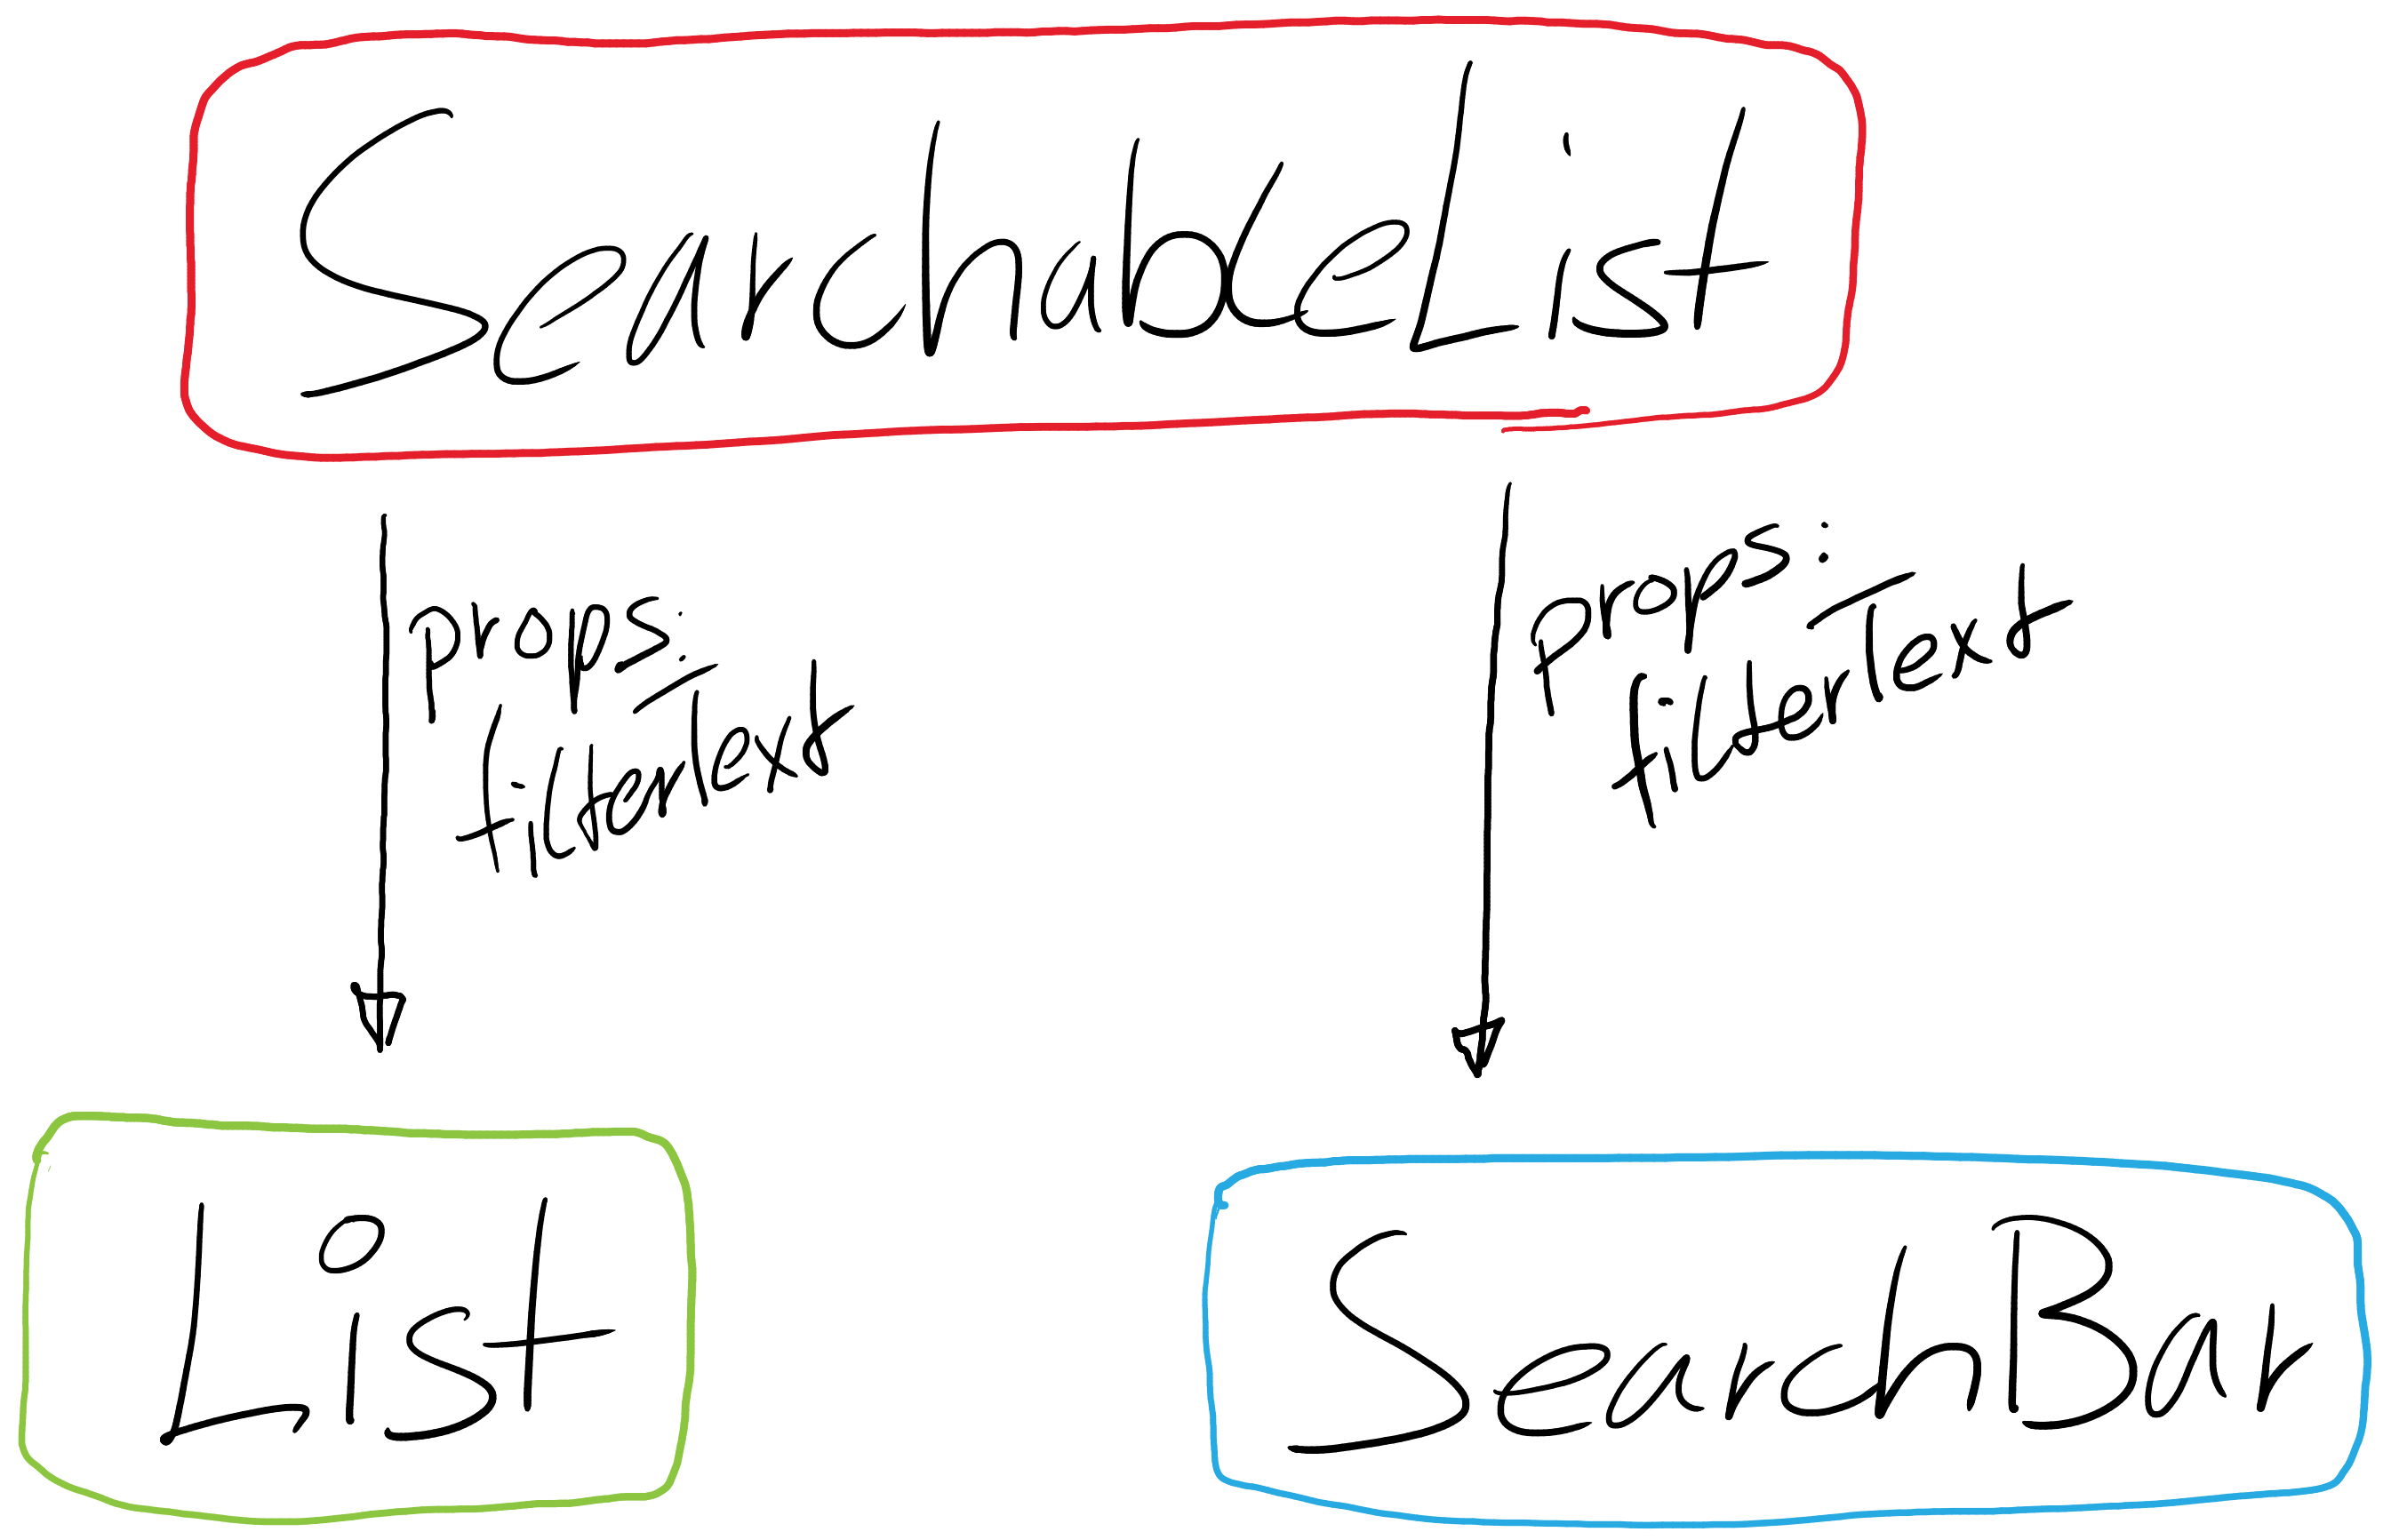
Cool, so we’ve decided that our state lives in SearchableList. First, add a getInitialState() method to SearchableList that returns {filterText: ''} to reflect the initial state of your application. Then, pass filterText to List and SearchBar as a prop. Finally, use these props to filter the ListItems in List and set the values of the form field in SearchBar.
1 2 3 4 5 6 7 8 9 10 11 12 13 14 15 16 17 18 19
//[SearchableList.js] var React = require('react'); var SearchBar = require('./SearchBar'); var List = require('./List');
var SearchableList = React.createClass({ getInitialState: function () { return({filterText: 'Foo Bar'}) }, render: function () { return ( <divid='SearchableList'> <SearchBarfilterText={this.state.filterText} /> <ListfilterText={this.state.filterText} /> </div> ) } }); module.exports = SearchableList;
1 2 3 4 5 6 7 8 9 10 11 12 13 14 15 16 17 18
//[SearchBar.js] var React = require('react');
var SearchBar = React.createClass({ render: function () { return ( <divid='SearchBar'> <input type="text" value={this.props.filterText} autofocus /> </div> ) } });
module.exports = SearchBar;
1 2 3 4 5 6 7 8 9 10 11 12 13 14
//[List.js] var React = require('react');
var List = React.createClass({ render: function () { return ( <divid='List'> List of items that match {this.props.filterText} </div> ) } });
module.exports = List;
You can start seeing how your application will behave: set filterText to "Foo Bar" and refresh your app. You’ll see that the data table is updated correctly.
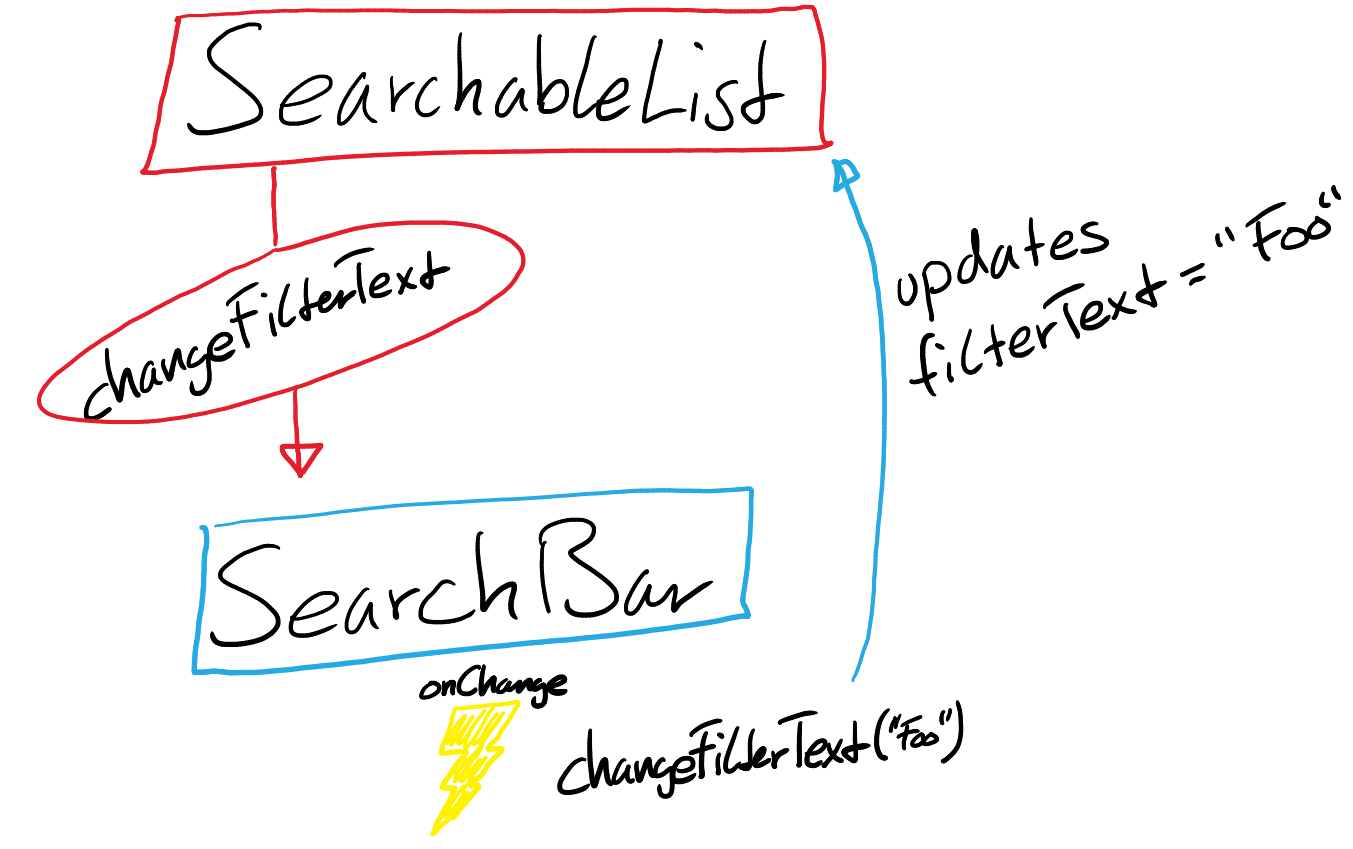
So far, we’ve built an app that renders correctly as a function of props and state flowing down the hierarchy. Now it’s time to support data flowing the other way: the form components deep in the hierarchy need to update the state in SearchableList.
React makes this data flow explicit to make it easy to understand how your program works, but it does require a little more typing than traditional two-way data binding. React provides an add-on called ReactLink to make this pattern as convenient as two-way binding, but for the purpose of this post, we’ll keep everything explicit.
If you try to type or check the box in the current version of the example, you’ll see that React ignores your input. This is intentional, as we’ve set the value prop of the input to always be equal to the state passed in from SearchableList.
Let’s think about what we want to happen. We want to make sure that whenever the user changes the form, we update the state to reflect the user input. Since components should only update their own state, SearchableList will pass a callback to SearchBar that will fire whenever the state should be updated. We can use the onChange event on the inputs to be notified of it. And the callback passed by SearchableList will call setState(), and the app will be updated.
Though this sounds complex, it’s really just a few lines of code. And it’s really explicit how your data is flowing throughout the app.
in SearchableList.js add the function changeFilterText and pass it to the SearchBar component.
1 2 3 4 5 6 7 8 9 10 11 12 13 14 15 16 17 18
//[SearchableList.js] ... var SearchableList = React.createClass({ getInitialState: function(){ return({filterText: ''}) }, //change the state in this wrapper function changeFilterText: function(newText){ this.setState({filterText: newText}); }, render: function(){ return ( <div id='SearchableList'> {/*pass the wrapper function to the SearchBar component via props*/} <SearchBar changeFilterText={this.changeFilterText} filterText={this.state.filterText} /> <List filterText={this.state.filterText} /> </div> ...
inside SearchBar.js call the before passed changeFilterText inside a wrapper function and assign the wrapper function to the onChange attribute.
//[SearchBar.js] ... var SearchBar = React.createClass({ handleChange: function(e){ //call the function we got passed from SearchableList this.props.changeFilterText(e.target.value); }, render: function(){ return ( <div id='SearchBar'> {/*handle changes with the freshly created handleChange function*/} <input type="text" value={this.props.filterText} onChange={this.handleChange} autofocus /> </div> ) ...
et voilà, this is our two-way data binding.
In computing, reactive programming is a programming paradigm oriented around data flows and the propagation of change. This means that it should be possible to express static or dynamic data flows with ease in the programming languages used, and that the underlying execution model will automatically propagate changes through the data flow.